

How To Install European Side Mount Drawer Slides
Lets bear witness you how to install drawer slides
Installation of drawer slides volition vary slightly depending on the style and options of your selected draw slides. Some drawer slides that you purchase may come with a installation guide, like this i, just if non, there are some elementary steps yous can follow to install whatsoever drawer slides. Luckily, the installation of the two most mutual types of drawer slides, Roller Slides and Brawl-Begetting Slides, are quite similar and y'all can use this guide to install either of them.

This guide is going to presume that yous have selected drawer slides that volition fit into your pattern, if yous're unsure most what to consider or are confused by what I am talking nearly check out this Drawer Slide 101 blog to acquire more.
Step 0: Separate Cabinet and Drawer Members
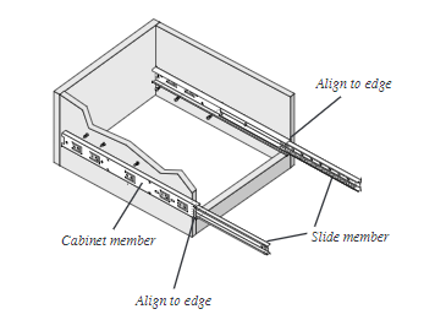
This is chosen step 0 because it is not required or possible depending on the type and style of your drawer slides. All drawer slides volition consist of at least ii components, the chiffonier member and the drawer fellow member. As their names suggest, chiffonier members mount to a stable or grounded component, i.e. the chiffonier, and the drawer member attaches to the moving component, i.east. the drawer. For roller slides, the ii members volition about probable be separate when y'all purchase them. If not, y'all simply slide the drawer member forward until fully extended and pop the drawer roller over the roller of the cabinet member. For brawl-bearing slides, they will have a third intermediate (slide) member that will stay connect to the cabinet member. If in that location is a release lever, similar shown below, betwixt intermediate member and the drawer member, they can be separated past pushing the lever and pulling forward. If the release lever is the on the right-hand side of the cabinet, you volition need to push downward to release, if on the left-hand side, yous volition demand to push upwards to release. Not all ball-begetting slides volition take release levers and if non, they cannot be separated.

It is of import to separate the cabinet member and the drawer fellow member, if possible, as it will make the rest of the install easier.
Stride one: Install Cabinet Member
Regardless of the type and style of your drawer slide, y'all will want to install the chiffonier member first. Depending on your mounting configuration, identify and marshal the cabinet member inside your chiffonier or stable component. You'll need to ensure that your set of drawer slides are level and parallel by ensuring that the distance from the edge of the chiffonier to the edge of the slide is the same for both drawer slides and by using a level.
If yous are planning to have overlay drawer fronts, which are drawers with fronts that overlap the sides of the cabinet, you lot should align the forepart of the cabinet member with the front edge of the cabinet. If you want to insert drawer fronts, which are drawers that have their front insert inside of the cabinet, you should setback the front end of the cabinet member past the thickness of the drawer front.
Once you have the chiffonier member aligned with your cabinet, spike information technology to the cabinet past using your fasteners of option into the recommend holes of the cabinet member. Typically, you desire to fasten your cabinet member using at to the lowest degree 3 holes/slots. If your cabinet fellow member has at least ii slotted holes for mounting, like below, there are used to allow for aligning at the stop of the install. For the cabinet, you volition usually utilize the horizonal slots for depth adjustments. If you lot want to make use of these slots for adjustments afterward, only fasten the chiffonier member using two fasteners at this signal.

If you program to use bolts to fastener your drawer slide, yous will need to pre-drill your bolt holes. You can practise this by aligning the cabinet member within the cabinet, mark the where the mounting slots are, then drilling the holes using the proper size drill bit.
NOTE: If you are using either releasing or non-releasing ball-bearing slides, you will need to slide the intermediate fellow member back and forrad to expose the sections of cabinet fellow member for mounting. Once mounted, the intermediate fellow member should slide smoothly over the fastened chiffonier member.
Footstep two: Install Drawer Fellow member
To install the drawer fellow member for a releasing ball-bearing slide and a roller slide, you simply align the front of the drawer member to the front end of the drawer. Again, you will want to ensure that both drawer members are level and parallel, but as well that they are properly aligned with your cabinet members to allow for the drawer to fit with your cabinet. One time aligned, fasten it to the chiffonier using your fasteners of selection into the recommend slots. Just like the cabinet member, slotted holes are used to let for adjustments at the stop of the process. For the drawer member, you usually volition use the vertical slots to permit for a height adjustment.

For non-releasing ball-bearing slides, it will be recommended to have a 2d pair of hands or a back up in place to hold the drawer in place while yous mount it to the drawer slides. As yous cannot remove the drawer member, you lot'll have to take the slide fully extended to mount the drawer to each slide. Once done, you can simply button your drawer closed.
Footstep three: Insert Drawer & Adjustments
Once all members are attached, you tin insert the drawer into the cabinet. For roller slides, you'll need to roll the drawer roller over the cabinet roller to position the drawer in place. For releasing ball-bearing slides, simply insert the drawer fellow member into the intermediate member and push close. The release lever will lock as the drawer closes.

If y'all used slotted mounting holes to brainstorm with, yous can now make adjustments to the position of the drawer slide if needed. Typically, the cabinet fellow member will take horizontal slots to adjust the depth of the drawer, while the drawer member will have vertical slots to accommodate the height of the depict slide.
Once all adjustments are fabricated, yous will now want to fasten each member using 3rd mounting pigsty, if not washed all ready. Y'all may likewise desire to supervene upon some of your screws and nuts to locking ones to improve stability. It is recommended that when supporting heavy loads, at to the lowest degree ii locking screws are used per fellow member.
FIRGELLI has the longest stroke telescopic drawer slides in the manufacture, that can carry up to 500-lbs in weight chapters. Click here to view our Drawer slides.

Source: https://www.firgelliauto.com/blogs/drawer-slides/how-to-install-drawer-slides
Posted by: byerswitterlass.blogspot.com
0 Response to "How To Install European Side Mount Drawer Slides"
Post a Comment